Thursday, August 26, 2010

Installing Toolkit for Oracle ( TOra) Database Client in Fedora 13


Tora – Toolkit for Oracle on Fedora 13

Tora is an Linux based Databse Client GUI application to access an databases Mysql, Postgres and Oracle. For Linux users, Tora is an Oracle client program equivalent to SQLTools in Windows. I herewith explain the installation method of tora on Fedora 13 (Goddard) without installing Oracle Database.

Requirement:
1. PC with Fedora 13 OS
2. Network connection with static IP

Installation:
Before starting installation, it is required to download the Oracle Client RPMs from Oracle website.
http://www.oracle.com/technology/sof...ent/index.html
Also required to download tora latest RPM from Sourceforge website. I downloaded latest tora binary file from Sourceforge website. The packages downloaded are
1. oracle-instantclient-basic-10.2.0.4-1.i386.rpm
2. oracle-instantclient-jdbc-10.2.0.4-1.i386.rpm
3. oracle-instantclient-odbc-10.2.0.4-1.i386.rpm
4. oracle-instantclient-sqlplus-10.2.0.4-1.i386.rpm
5. tora-2.1.2-1.fc13.remi.i586.rpm
6. tora-2.1.2.tar.bz2
In the above list, 'oracle-instantclient-jdbc' is not an compulsory.
STEP1:
Pre-installation requirements:
It is required to install Development Tools and Qt application is required for oracle client and tora. Hence the same should be installed first
# yum groupinstall “Development Tools”

STEP 2:
Installing Oracle instant Clients:
Install the oracle client RPMs, from its directory where it is downloaded
# yum localinstall oracle-instantclient-*.rpm --nogpgcheck
or
# rpm -ivh oracle-instantclient-*.rpm
STEP 3 :
Setting up Environment variables:
For proper functioning of oracle Instant Client, Environemt variables should be defined correctly. Create and open '/etc/profile.d/oracle.sh' file.
# gedit /etc/profile.d/oracle.sh
Paste the following line,
----------------------text in the file----------------------------------
#!/bin/sh
# Set up Oracle environment
export ORACLE_HOME=/usr/lib/oracle/10.2.0.4/client
export PATH=$PATH:$ORACLE_HOME/bin
export LD_LIBRARY_PATH=$LD_LIBRARY_PATH:$ORACLE_HOME/lib
export TNS_ADMIN=$ORACLE_HOME

----------------------text in the file----------------------------------
# chmod +x /etc/profile.d/oracle.sh
Please ensure your Oracle instant Client version. To take effect, run
# source /etc/profile.d/oracle.sh

STEP 4 :
Checking Oracle-Instant-Cleint:
Copy tnsnames.ora file in Oracle-Home directory.
-----------------------screen shot ------------------------------------
[tneb@localhost ~]$ more $ORACLE_HOME/tnsnames.ora
MGR =
(DESCRIPTION =
(ADDRESS = (PROTOCOL = TCP ) ( HOST = 172.20.1.10) (PORT = 1521))
(CONNECT_DATA = (SID=cbelt))
)


[tneb@localhost ~]$
[tneb@localhost ~]$ sqlplus hhd@MGR

SQL*Plus: Release 10.2.0.4.0 - Production on Wed Aug 25 15:00:47 2010

Copyright (c) 1982, 2007, Oracle. All Rights Reserved.

Enter password:

Connected to:
Oracle Database 10g Enterprise Edition Release 10.2.0.3.0 - 64bit Production
With the Partitioning, OLAP and Data Mining options

SQL> select sysdate from dual;

SYSDATE
---------
25-AUG-10

SQL> exit
Disconnected from Oracle Database 10g Enterprise Edition Release 10.2.0.3.0 - 64bit Production
With the Partitioning, OLAP and Data Mining options
[tneb@localhost ~]$
----------------------screen shot ----------------------------------

STEP 5 :
Tora Installation:
Copy the ' libclntsh.so.10.1' and ' libocci.so.10.1' as ' libclntsh.so ' and ' libocci.so' respectively.
# cd $ORACLE_HOME/lib
# cp libclntsh.so.10.1 libclntsh.so
# cp libocci.so.10.1 libocci.so
Then, goto Tora binary file directory and extract it.
$ tar xvjf tora-2.1.2.tar.bz2
Open tora folder
$cd tora-2.1.2
Then run the configure file as root
$ su
# ./configure
After that make it and install it.
#make
#make install
STEP 6 :
Running Tora
$ tora
The new window shows as below
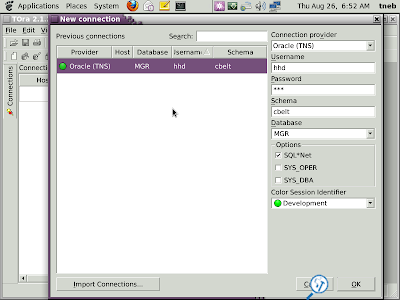


Enter username, password, DB Name( host string name) as mentioned in tnsname.ora and select Color Session identifier as you wish, then press Ok.
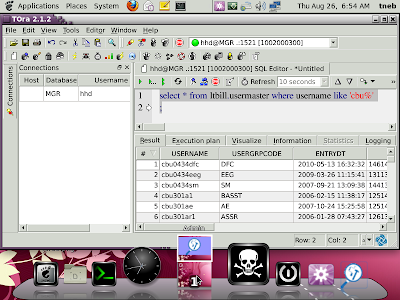
In the window, in the sql-editor plane enter your query and run it,
The screen shot of result is as below,


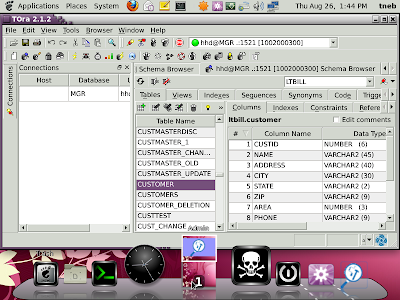
The table schema browser shows the table structure and screen shot is as below,


TROUBLE SHOOTING :

1. If 'ORACLE_HOME/lib' not found error shows when running configure file, then add the path by creating new conf file in ld.so.conf.d directory
# echo "/usr/lib/oracle/10.2.0.4/client/lib" > /etc/ld.so.conf.d/oracle.conf
Run ldconfig to take effect,
# ldconfig

2. If there is an error as 'Qt not found' then add the paths in configure running script input as below

# ./configure --with-qt-dir=/usr/lib/qt-4 --with-qt-includes=/usr/lib/qt-4/
include --with-qt-libraries=/usr/lib/qt-4/lib
3. Any other errors then add relevant paths in command line, the typical command as below.

# ./configure --with-qt-dir=/usr/lib/qt-4 --with-qt-includes=/usr/lib/qt-4/
include --with-qt-libraries=/usr/lib/qt-4/lib --with-oracle=$ORACLE_HOME --with-
oci-version=10G --with-oracle-libraries=$ORACLE_HOME/lib --without-kde –enable-libsuffix=

4. If 'tora' command not working then create an symbolic link in library, then try
# ln -s /usr/local/tora/bin/tora /usr/bin/tora

Caution: Paths are depends as your OS and application versions.

Happy Tweaking,
Padhu
* * * * *

Thursday, June 18, 2009

Internet connection in Ubuntu using Aircel GPRS

INTERNET BROWSING USING AIRCEL GPRS

Requirement:

  • PC with Linux OS

  • Mobile phone with USB data cable

  • GPRS Enabled Aircel SIM card

  • wvdial application package in Linux OS. (Mostly available in all flavour of Linux OS)


Pre-Configuration:


  1. Ensure your mobile phone in data connection mode. By default, It is in Memory card connection mode.

  2. Open a terminal,

    # tail -f /var/log/messages.

  3. plugin the data cable of mobile in USB port and listen messages. It will show Product ID, Vendor ID and Port Number. It is also shows that New USB Modem is pluged in. You should be note it.

  4. Check that your Kernel recognise the device by viewing,

    # cat /proc/bus/usb/devices


    If it is shows the devices list then leave rest of points below. Otherwise do the following things.

  1. Open another terminal,

    # modprobe usbserial vendor=0x1111 product=0x2222

    In another terminal,

    # dmesg

    This shows that the USB device (Mobile) is recognised by kernel as a log message.

    (This should be made for Old Linux OS and not for recent Ones)]

  1. Reboot your machine, Then open terminal, and type

    #tail -f /var/log/messages

    Then insert the usb cable,This shows the USB devices recognised as below।


Jun 18 22:09:37 padhu-desktop kernel: [ 125.452018] usb 3-2: new full speed USB device using uhci_hcd and address 2

Jun 18 22:09:38 padhu-desktop kernel: [ 125.705635] usb 3-2: configuration #1 chosen from 1 choice

Jun 18 22:09:38 padhu-desktop kernel: [ 125.831801] cdc_acm 3-2:1.0: ttyACM0: USB ACM device

Jun 18 22:09:38 padhu-desktop kernel: [ 125.836367] usbcore: registered new interface driver cdc_acm

Jun 18 22:09:38 padhu-desktop kernel: [ 125.837118] cdc_acm: v0.26:USB Abstract Control Model driver for USB modems and ISDN adapters


Aircel Mobile Offices:


Aircel pre-paid provides Mobile Internet Freedom Pack to their customers to make an internet browsing.

To activate for Three Day, Reacharge for Rs 14/= from nearest aircel easy recharge center.

For 30 Days, Reacharge for Rs 98/= from nearest aircel easy recharge center.

They will send the mobile office settings to your mobile. Save it. Username and Password is not required. Phone number for Dial-up the connection is '*99#'


Using wvdial:


  • In terminal,

    #wvdialconfig /etc/wvdial.conf

    This will create the wvdial configuration file.

  • Open /etc/wvdial.conf by using vi editor or nano, then remove ';' at the starting of every line.

    Then add some missed lines in the file. The correct content of wvdial.conf as below.

[Dialer Defaults]

Init1 = ATZ

Init2 = ATQ0 V1 E1 S0=0 &C1 &D2 +FCLASS=0

Modem Type = USB Modem

Baud = 460800

New PPPD = 1

Modem = /dev/ttyACM0

ISDN = 0

Stupid Mode = 1

Phone =*99#

Username = a

Password = a

Init3 = AT+CGDCONT=1,"IP","aircelgprs.pr"

Dial Command = ATDT

Ask Password = 0

Compuserve =0

Auto DNS = 1

Flow Control = Hardware


  • Now unplug the USB Cable . Reinsert it after few sconds. In terminal

    # wvdial

    Now few details are showed. Internal IP and External IPs will be displayed. DNS IPs also displayed. At the end 'Connection was made' message displayed. Don't close the terminal. Start Browsing. After completion of browsing, terminate the connection by pressing 'Ctrl+C' in the terminal. After disconnecting internet, # prompt will come back.

The screen shot is as below

padhu@padhu-desktop:~$ sudo wvdial

[sudo] password for padhu:

--> WvDial: Internet dialer version 1.60

--> Cannot get information for serial port.

--> Initializing modem.

--> Sending: ATZ

ATZ

OK

--> Sending: ATQ0 V1 E1 S0=0 &C1 &D2 +FCLASS=0

ATQ0 V1 E1 S0=0 &C1 &D2 +FCLASS=0

OK

--> Sending: AT+CGDCONT=1,"IP","aircelgprs.pr"

AT+CGDCONT=1,"IP","aircelgprs.pr"

OK

--> Modem initialized.

--> Sending: ATDT*99#

--> Waiting for carrier.

ATDT*99#

CONNECT

--> Carrier detected. Starting PPP immediately.

--> Starting pppd at Thu Jun 18 22:09:57 2009

--> Pid of pppd: 5793

--> Using interface ppp0

--> pppd: Џ����� ��� [01]

--> pppd: Џ����� ��� [01]

--> pppd: Џ����� ��� [01]

--> pppd: Џ����� ��� [01]

--> local IP address 10.1.7.248

--> pppd: Џ����� ��� [01]

--> remote IP address 192.168.100.101

--> pppd: Џ����� ��� [01]

--> primary DNS address 192.168.35.199

--> pppd: Џ����� ��� [01]

--> secondary DNS address 192.168.35.200

--> pppd: Џ����� ��� [01]

/etc/var/log/messages shows as below


Jun 18 22:09:57 padhu-desktop kernel: [ 145.029608] PPP generic driver version 2.4.2

Jun 18 22:09:57 padhu-desktop pppd[5793]: pppd 2.4.4 started by root, uid 0

Jun 18 22:09:57 padhu-desktop pppd[5793]: Using interface ppp0

Jun 18 22:09:57 padhu-desktop pppd[5793]: Connect: ppp0 <--> /dev/ttyACM0

Jun 18 22:09:57 padhu-desktop pppd[5793]: PAP authentication succeeded

Jun 18 22:09:57 padhu-desktop kernel: [ 145.176902] PPP BSD Compression module registered

Jun 18 22:09:57 padhu-desktop kernel: [ 145.248560] PPP Deflate Compression module registered

Jun 18 22:10:03 padhu-desktop pppd[5793]: local IP address 10.1.7.248

Jun 18 22:10:03 padhu-desktop pppd[5793]: remote IP address 192.168.100.101

Jun 18 22:10:03 padhu-desktop pppd[5793]: primary DNS address 192.168.35.199

Jun 18 22:10:03 padhu-desktop pppd[5793]: secondary DNS address 192.168.35.200

  • Ensure that your firewall should be configured suitabily to use USB Modem. Otherwise disable it if you are an Home user or short time browser.

Happy browsing......

by

Padhu